Orchestrating Containers With Kubernetes
What is Kubernetes?
Did you know?
The word “Kubernetes” is derived from the Greek word “κυβερνήτης” (kubernḗtēs), which translates to “helmsman” or “pilot”.
As you can probably guess, It’s a metaphorical reference, as Kubernetes, like a ship’s helmsman, guides and manages the deployment and scaling of containerized applications across a cluster of servers. “Docker - containers - shipping - kubernetes - Ah, what an amazing philosophy!”
Coming to the actual definition, Kubernetes is an open-source container orchestration platform that automates the deployment, scaling, and management of containerized applications. It essentially manages a group of computing nodes (called a cluster) to run containerized applications, handling tasks like deploying, scaling, and rolling out updates.
To understand Kubernetes, popularly referred to as K8s, from absolute scratch, this is the best resource I have come across: Link to resource.
Terms to know before boarding the ship of K8s
When working with Kubernetes, knowing a set of terms is essential to effectively manage and deploy applications. The below table can be used as a reference as and when you come across these terms:
| Term | Description |
|---|---|
| Pod | The smallest deployable unit in Kubernetes. A pod can hold one or more containers that share storage, network, and a lifecycle. |
| Node | A worker machine (VM or physical) that runs pods. Managed by the control plane. |
| Cluster | A set of nodes grouped together managed by Kubernetes. |
| Control Plane | The set of components that manage the overall Kubernetes cluster (API server, scheduler, controller manager, etc.). |
| Kubelet | An agent that runs on each node and ensures containers are running in a pod. |
| Deployment | Manages the deployment and scaling of pods. Useful for stateless applications. |
| StatefulSet | Manages stateful applications, maintaining sticky identity for pods. |
| DaemonSet | Ensures that a pod runs on all (or some) nodes. |
| ReplicaSet | Ensures a specified number of pod replicas are running at all times. Used by deployments to ensure better/faster availability. |
| Job/CronJob | Jobs run tasks to completion. CronJobs run them on a schedule. |
| Service | An abstraction that exposes a set of pods as a network service. Types: ClusterIP, NodePort, LoadBalancer. |
| Ingress | Manages external access to services, typically via HTTP/HTTPS. |
| Ingress Controller | Implements the ingress rules (e.g., NGINX, Traefik). |
| ConfigMap | Used to pass configuration data into pods as environment variables or files. |
| Secret | Stores sensitive information like passwords or tokens, encoded in base64. |
| PersistentVolume(PV) | A piece of storage in the cluster that has been provisioned. |
| PersistentVolumeClaim (PVC) | A request for storage by a user. Pods use PVCs to consume PVs. |
| StorageClass | Defines different types of storage (e.g., SSD vs HDD) with parameters for dynamic provisioning. |
| Namespace | A way to divide cluster resources between multiple users/projects. |
| Label / Selector | Key-value pairs used for identifying and grouping Kubernetes objects. |
| Taint / Toleration | Taints are applied to nodes to repel pods that do not explicitly tolerate them. Tolerations are applied to pods to let them bypass the taint and be scheduled on tainted nodes. This mechanism allows us to ensure that only specific pods can run on certain nodes, such as nodes reserved for system workloads, high-performance computing, or GPU-heavy workloads. |
| Affinity / Anti-Affinity | Affinity and anti-affinity rules allow for advanced control over pod placement by influencing the scheduler’s decisions based on labels, either of nodes or other pods. Pod affinity allows a pod to be scheduled on the same node (or within the same topology domain) as other pods with specific labels. Conversely, pod anti-affinity is used to spread pods apart — preventing them from being scheduled on the same node or zone as other matching pods. |
| Helm | A package manager for Kubernetes to manage charts (pre-configured resources). |
| kubectl | Command-line tool to interact with the Kubernetes cluster. |
How does Kubernetes work?
Understanding with an example
Imagine yourself as the founding engineer of a food delivery application. You have:
- A backend server that handles orders
- A frontend website
- A database.
As your app grows, you don’t want to manage servers manually anymore. You want something to:
- Run these parts across different machines,
- Restart them if they crash,
- Increase or decrease the number of servers based on demand,
- Make sure updates don’t break anything.
Kubernetes does exactly that.
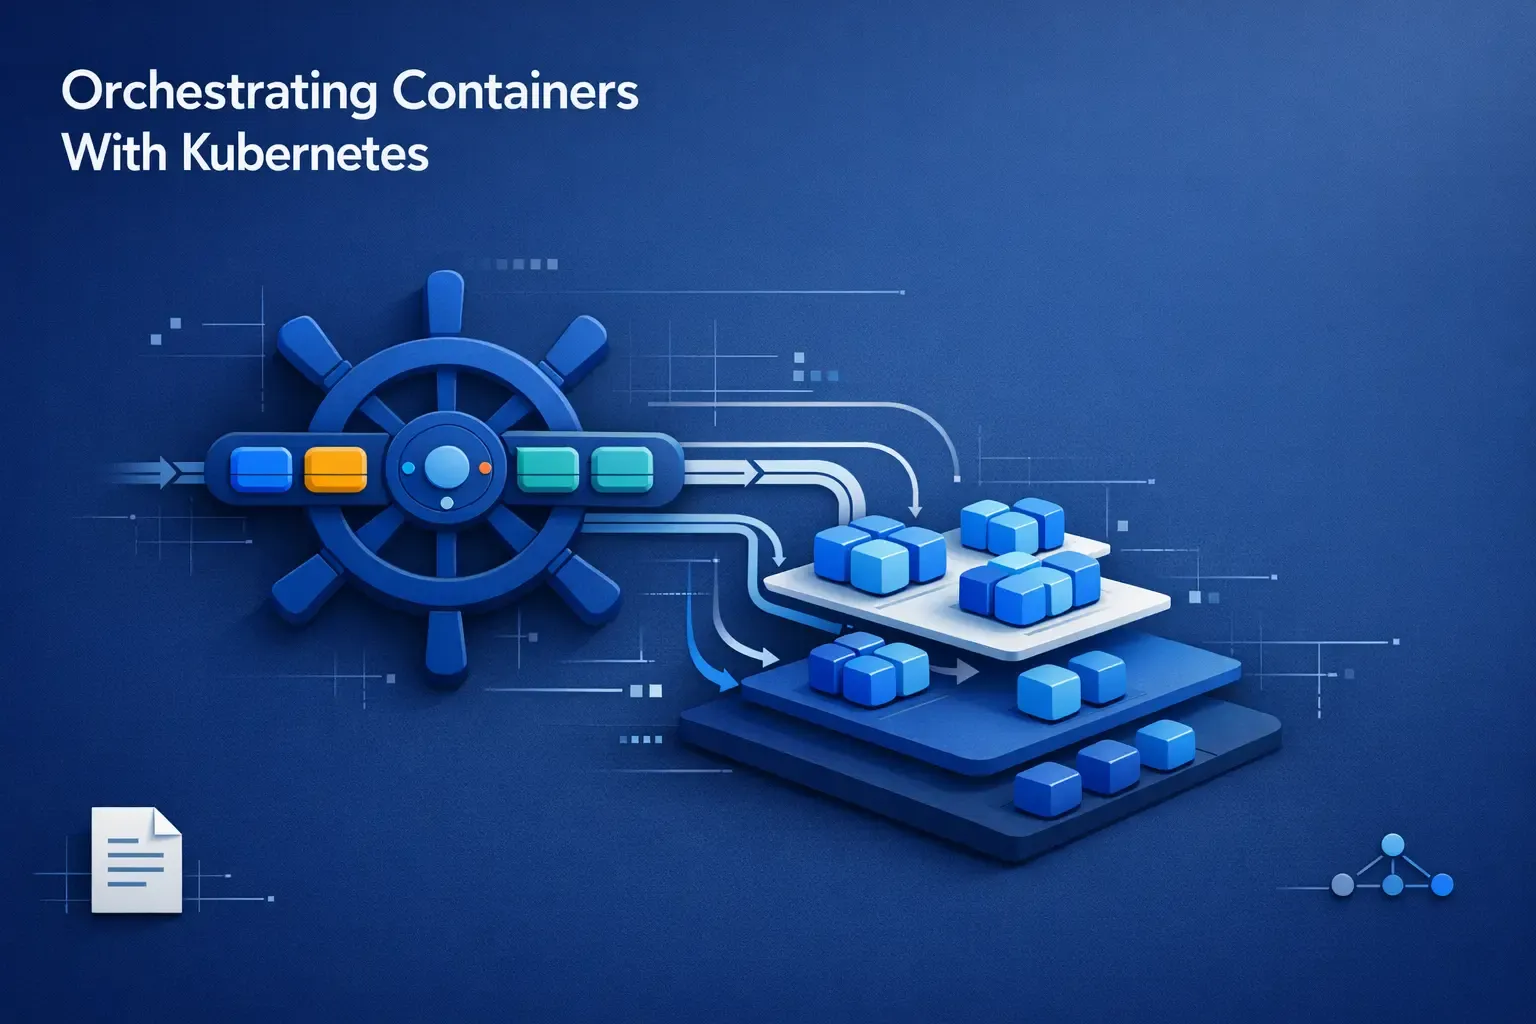
Diving deeper into the working of K8s
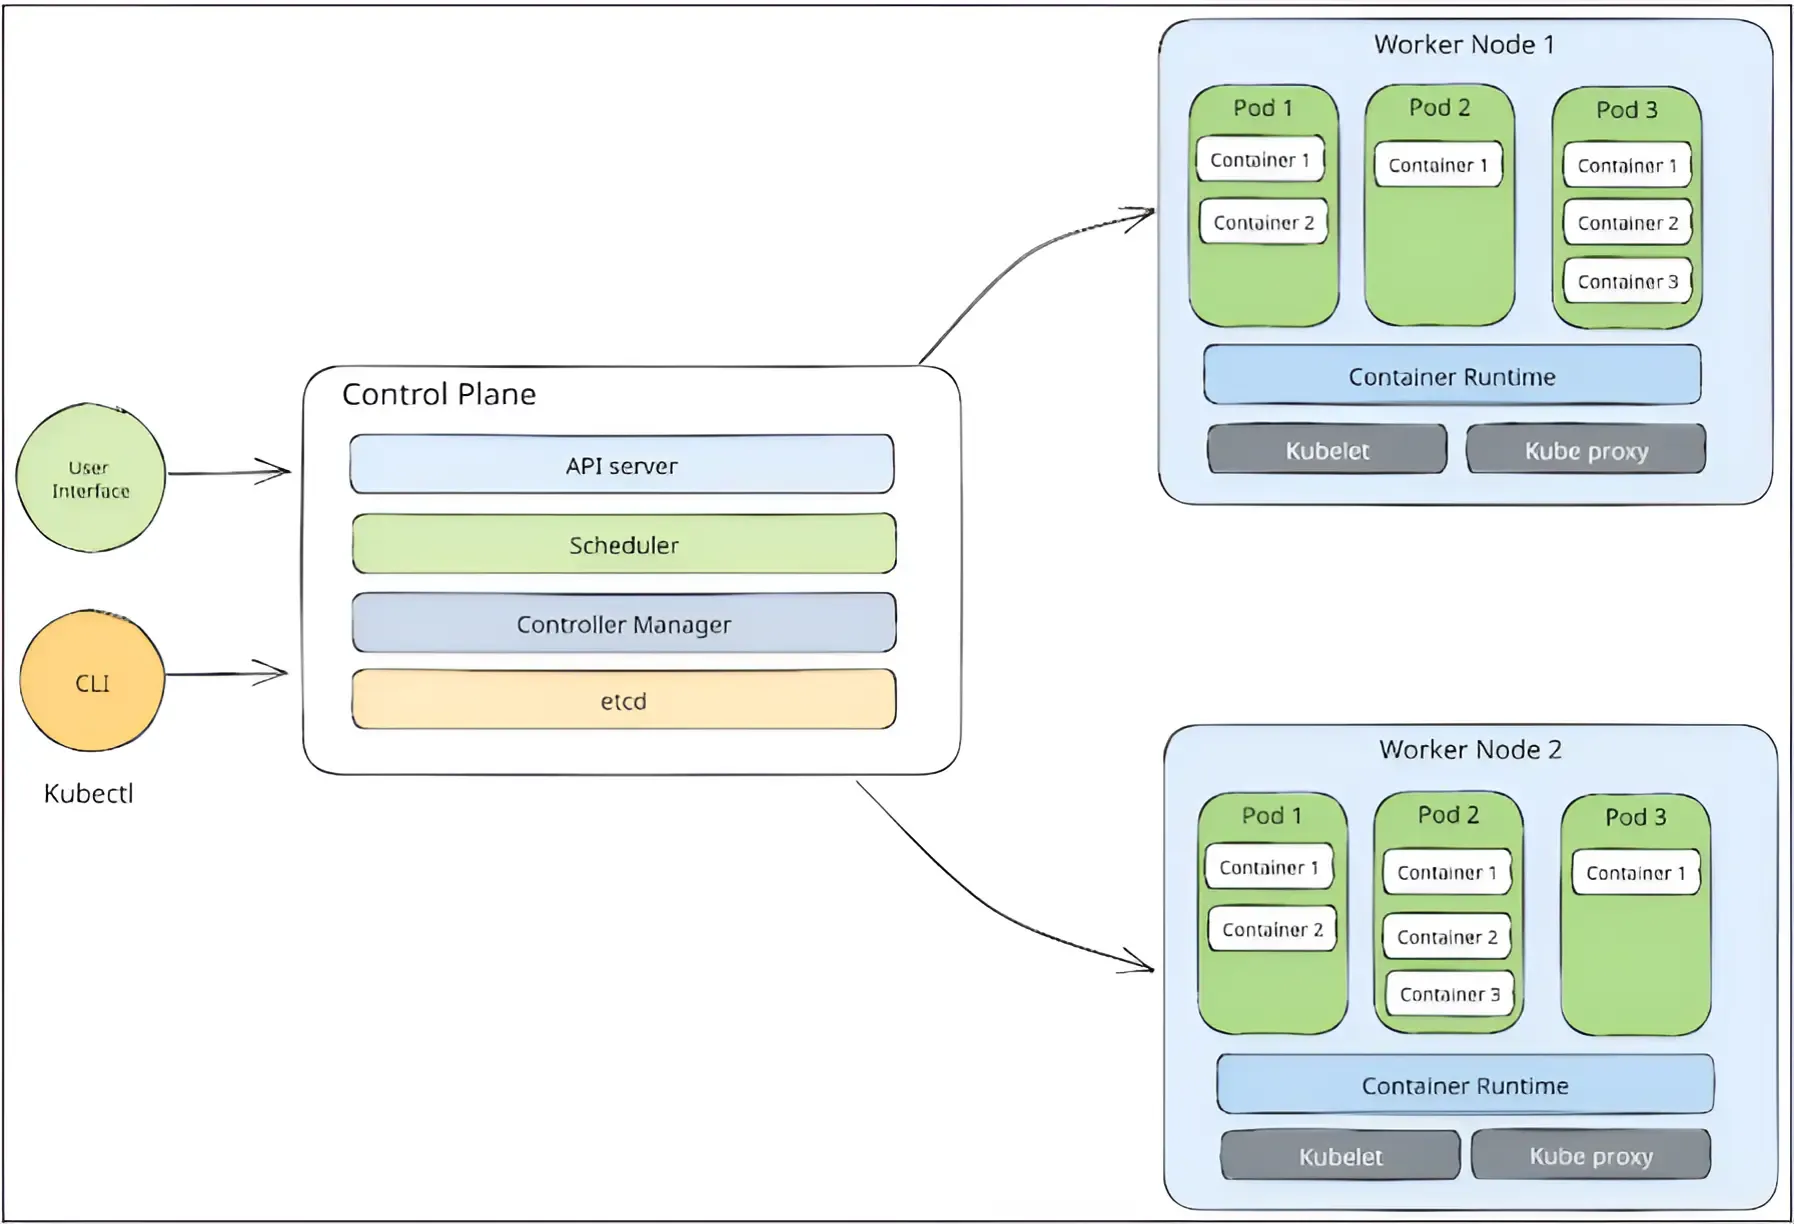
This diagram illustrates how Kubernetes (k8s) works by breaking down its architecture into two main parts: the Control Plane and the Worker Nodes. Let’s first look at the components and their functionalities followed by the entire flow of actions.
The Control Plane
The Control Plane is the brain of the Kubernetes cluster. It manages the overall system — deciding what runs where and how.
Key components:
-
API Server:
Acts as the gateway. All commands (from kubectl or the UI) go through this. It’s the front-end of the control plane. -
Scheduler:
Determines on which node a new pod should run, based on resource availability and constraints. -
Controller Manager:
Watches the state of the cluster and tries to bring the current state closer to the desired state (e.g., restarting crashed pods). -
etcd:
A distributed key-value store. Stores all cluster data (like the DB of Kubernetes).
Inputs to the Control Plane:
User Interface (UI) and Command Line (kubectl) interact with the API Server to control the cluster.
Worker Nodes
Pods
Worker nodes are where the actual workloads run. Each worker node contains pods. All containers in a pod share the same network and storage. In the diagram, we see pods with 1–3 containers each, showing how Kubernetes can run multiple containers per pod.
Node-Level Components:
Container Runtime - Software responsible for running containers (e.g., Docker, containerd).
Kubelet - Agent that communicates with the API server and ensures the containers described in the Pod specs are running.
Kube Proxy - Handles network routing, load balancing, and ensuring each Pod gets its own IP address. Also allows Pods to talk to each other and to services.
Understanding the flow of actions
Now that we understand what the individual components are, and their functionality, let’s look at the entire flow of things:
Let’s say, you run a command like
kubectl apply -f deployment.yaml(don’t worry if you have no idea what this is, we shall cover it later in the blog) You’re essentially placing an order for Kubernetes to bring your application to life. That request first hits the API Server, the front desk of the control plane, which logs your intent into etcd, Kubernetes’ reliable memory.
Next, the Scheduler steps in, scanning all available nodes and deciding the best place to run your new pod based on resource availability and constraints.
Once a node is picked, the Controller Manager takes charge to ensure your desired state becomes reality — it creates the pod definition and sets the wheels in motion. Over on the selected worker node, the Kubelet gets to work. It reads the pod specs and nudges the container runtime to spin up the actual containers.
Meanwhile, the Kube Proxy quietly sets up the network plumbing, making sure your new pod can talk to the world — and the world can talk back.
Learning Kubernetes hands-on
Enough of theory and terminologies, let’s dive right into running kubernetes in your own machine, while conveniently scrolling through this blog.
In the below hands-on exercise, we shall create a simple hello-world application in React, containerize it, set up and deploy your container to Kubernetes. For this tutorial, I will be using minikube. Feel free to use any other alternative such as Google Kubernetes Engine (GKE).
Installation
We need to install the following things to proceed:
- Node - Installation link
- Docker - Installation link
- Minikube & kubectl installation - Installation link
Step 1 - Create your React app
Run the following commands in your local to create and build a simple hello world application in React.
npx create-vite@latest hello-k8s --template react
cd hello-k8s
npm run dev
Go to App.jsx within your src directory, and paste this:
import React from 'react';
import './App.css';
function App(){
    return (
        <div className="App">
            <header className="App-header">
                <h1>👋 Hello from Kubernetes!</h1>
                <p>This React app is running inside a Kubernetes pod 🚀</p>
            </header>
        </div>
    );
}
export default App;
Go to App.css and paste this:
.App {
  text-align: center;
  font-family: "Segoe UI", Tahoma, Geneva, Verdana, sans-serif;
  background-color: #f4f4f4;
  height: 100vh;
  display: flex;
  flex-direction: column;
  justify-content: center;
}

.App-header {
  background-color: #282c34;
  padding: 40px;
  color: white;
  border-radius: 12px;
  margin: 0 auto;
  max-width: 600px;
  box-shadow: 0 8px 16px rgba(0, 0, 0, 0.1);
}

h1 {
  font-size: 2.5rem;
  margin-bottom: 20px;
}

p {
  font-size: 1.2rem;
}
Now, to build this application, in the root directory of hello-k8s, run:
npm run build
This will build your React app, and create minified bundles for the same.
Step 2 - Create a Dockerfile within your application
In the root directory of this application create a Dockerfile
# Step 1:Build the React app
FROM node:18-alpine as builder
WORKDIR /app
COPY ..
RUN npm install && npm run build

# Step 2: Serve using nginx
FROM nginx:alpine
COPY --from=builder /app/build /usr/share/nginx/html
EXPOSE 80
Build and test the Dockerfile locally using the commands:
docker build -t hello-k8s .
docker run -p 8080:80 hello-k8s
Once your build and run completes successfully, you’re one step closer to deploying your first application to Kubernetes.
Step 3 - Push to Docker Hub
Let’s now push your application to Docker hub, so that you can share your image with people and collaborate with them. Run the following commands to push your container to DockerHub:
docker tag hello-k8s {YOUR_DOCKER_USERNAME}/hello-k8s
docker push {YOUR_DOCKER_USERNAME}/hello-k8s
Step 4 - Set up Minikube
Run the following commands:
minikube start
kubectl get nodes
Make sure Docker is using Minikube’s Docker daemon if you want to skip pushing to Docker Hub:
eval $(minikube docker-env)
docker build -t hello-k8s .
The first command sets your terminal’s Docker CLI to point to the Docker daemon inside the Minikube VM, instead of your system’s default Docker.
Step 5 - Create deployment and service
deployment.yaml
apiVersion: apps/v1
kind: Deployment
metadata:
  name: hello-k8s
spec:
  replicas: 2
  selector:
    matchLabels:
      app: hello-k8s
  template:
    metadata:
      labels:
        app: hello-k8s
    spec:
      containers:
        - name: react-app
          image: YOUR_DOCKER_USERNAME/hello-k8s
          ports:
            - containerPort: 80
Decoding the deployment file
This Kubernetes Deployment runs 2 replicas of a React app using your Docker image (YOUR_DOCKER_USERNAME/hello-k8s) and exposes it on port 80. It uses label selectors (app: hello-k8s) to match and manage the right set of pods, ensuring Kubernetes knows which pods belong to this deployment. This setup enables easy scaling, rolling updates, and self-healing of your frontend app within the cluster.
service.yaml
apiVersion: v1
kind: Service
metadata:
  name: hello-k8s-service
spec:
  type: NodePort
  selector:
    app: hello-k8s
  ports:
    - protocol: TCP
      port: 80
      targetPort: 80
      nodePort: 30007
Decoding the service file
This Kubernetes Service exposes your hello-k8s app externally using NodePort. It forwards traffic from port 30007 on each node to port 80 of matching pods (selected via app: hello-k8s). This lets users access your app from outside the cluster using the node’s IP and port 30007 — great for quick testing or development access.
Step 6 - Deploy the service on Kubernetes
To deploy your service on kubernetes, run the following commands:
kubectl apply -f deployment.yaml
kubectl apply -f service.yaml
To list all pods running in the current Kubernetes namespace
kubectl get podsOutput:
| NAME                          | READY | STATUS  |  RESTARTS | AGE |
| hello-k8s-5b6bb5cc9c-8v2s7    | 1/1   | Running |          0|  5m |
| hello-k8s-5b6bb5cc9c-d2l58    | 1/1   | Running |          0|  5m |
To retrieve detailed information about your service, run:
kubectl get service hello-k8s-serviceOutput:
| NAME              | TYPE      | CLUSTER-IP     | EXTERNAL-IP | PORT(S)      | AGE |
| hello-k8s-service | NodePort  | 10.107.154.66  | <none>      | 80:30007/TCP | 5m  |
To access the service, run:
minikube service hello-k8s-serviceOutput:
| Starting tunnel for service hello-k8s-service.
|-----------|--------------------|-------------|---------------------------
| NAMESPACE |       NAME         | TARGET PORT |            URL
|-----------|--------------------|-------------|---------------------------
| default   | hello-k8s-service  |        80   | http://127.0.0.1:30007
|-----------|--------------------|-------------|---------------------------
| Opening service default/hello-k8s-service in default browser...
Explanation
The output of minikube service hello-k8s-service shows the details of the hello-k8s-service in your Minikube cluster. It provides the service’s namespace, name, target port (80), and a URL (http://127.0.0.1:30007) to access the service locally. Minikube also opens this URL in your default browser for easy access to the app running inside the cluster.
Finally, this will open your browser with the React Hello World page!
Wrapping it all up
Congratulations! You’ve just taken your first real step into the world of Kubernetes. From getting a grasp on what Kubernetes is all about, to containerizing a React app and deploying it using Minikube, you’ve moved beyond theory and into hands-on experience.
What once felt like a blur of YAML files, pods, and unfamiliar jargon has now taken shape. You’ve seen Kubernetes in action — handling deployments, managing services, restarting pods when needed, and making scaling feel effortless. It’s a powerful system, and now you know how to use it.
Of course, there’s still a lot more to discover — Helm charts, ingress controllers, secrets management, persistent storage, and more. But every expert starts somewhere, and you’ve already launched your first application. That’s a big win.
Keep experimenting, keep learning — and let Kubernetes take care of the orchestration while you focus on building what matters.
References and helpful links
https://kubernetes.io/docs/home/
https://medium.com/@platform.engineers/deploying-a-simple-web-application-on-kubernetes-43bbf724c23d
https://yitaek.medium.com/advanced-kubernetes-topics-53d0358833bb